
Post by matthew on Feb 6, 2006 10:24:53 GMT -5
Making a smilie in Paint Shop Pro using the Selection Tool
Open a new image 200 x 200 pixels
Create a new Raster Layer (Layers > New Raster Layer)
In the Tools Toolbar palette, select the selection tool, and make these settings
Selection Type: Circle
Mode: Replace
Feather: 0
Anti-alias: Checked
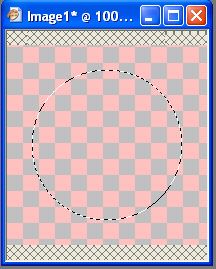
Click on the info Tab in the Overview Palette, and position your cursor in the centre of the image (x:100 y:100), and create a circle 150 x 150 pixels.
Click on the forground a stroke properties material box to open up the Material Properties dialogue, and enter this colour #9f5800 .Press ok.
In the Tools Toolbar palette, select the Flood Fill tool, and fill the selection.

Create a new Raster Layer (Layers > New Raster Layer)
Go to Selections > Modify > Contract Number of Pixels: 8. Press ok.
Click on the forground a stroke properties material box to open up the Material Properties dialogue, and enter this colour #ffde8c .Press ok.
and flood fill the selection

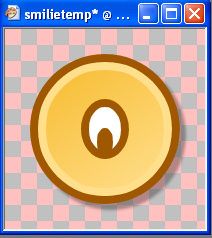
Create a new Raster Layer (Layers > New Raster Layer)
Go to Selections > Modify > Contract Number of Pixels: 8. Press ok.
Click on the background and fill properties material box to open up the Material Properties dialogue, and enter this colour #f7bd31 .Press ok.
Then, Click on the forground a stroke properties material box to open up the Material Properties dialogue, and select the Gradient Tab. Select the foreground-Background Gradient, and make these settings
Angle: 145
Repeats: 0
Invert: Checked
Style: Linear
Press ok, and flood fill the selection.
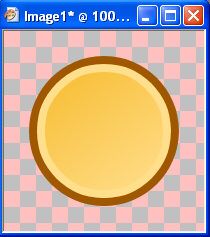
Go to Selections > Select None or (Ctrl +D)
Go to the layers Palette, and click layer 2.
Then go to Effects > 3d Effects > Dropshadow and make these settings
Vertical: 6
Horizontal: 6
Opacity: 30
Blur: 4.00
Colour: #000000
And Press ok.
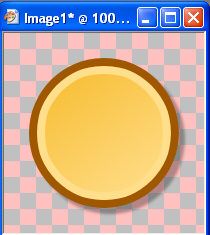
That's the main smilie image completed. Save as a psp. file.
Now to create a smilie face ;D
Click on Raster layer 4, and Create a new Raster Layer (Layers > New Raster Layer)
In the Tools Toolbar palette, select the selection tool, and make these settings
Selection Type: Elipse
Mode: Replace
Feather: 0
Anti-alias: Checked
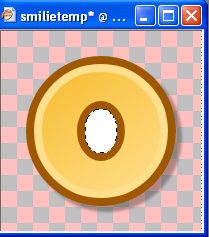
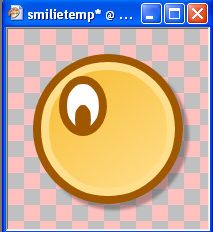
Click on the info Tab in the Overview Palette, and position your cursor in the centre of the image (x:100 y:100), and create an Elipse 48 x 60 pixels.
Floodfill the selection with the border colour #9f5800
Go to Selections > Modify > Contract Number of Pixels: 8. Press ok.
Then, Floodfill the selection with #ffffff
Create a new Raster Layer (Layers > New Raster Layer)
Then, Go to Selections > Modify > Contract Number of Pixels: 8. Press ok.
Floodfill the selection with the #9f5800
Go to Selections > Select None or (Ctrl +D)
In the Tools Toolbar palette, select the Move tool and position the filled selection downwards
make sure that Raster 6 is highlighted in the layers palette, and go to Layers > Merge > Merge down.
Using the the Move tool, move the eye into position
Go to Layers > Duplicate
Then Image > Mirror (or Ctrl + M)
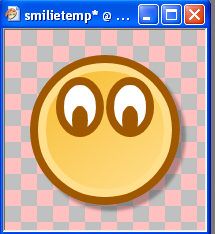
In the layers Palette, Click on Raster Layer 4, and Go to Selections > Select All (or Ctrl + A)
Then go to Selections > Float (or Ctrl + F)
Then go to Selections > Defloat (or Ctrl + Shift + F)
Click on the Top layer (should be copy of Raster 5) and Create a new Raster Layer (Layers > New Raster Layer)
Then, Go to Selections > Modify > Contract Number of Pixels: 8. Press ok.
In the Tools Toolbar palette, select the selection tool, and make these settings
Selection Type: Rectangle
Mode: Replace
Feather: 0
Anti-alias: Checked
Holding down the Ctrl Key (or select mode: Remove), start at the top left of the image and make a selection

when you release the left mouse button, you should have a selection like this
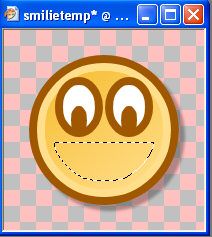
Flood fill the selection with #9f5800, then Go to Selections > Modify > Contract Number of Pixels: 8, and flood fill the selection with #ffffff
Go to Selections > Select None or (Ctrl +D)
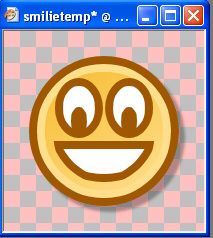
In the Layers Palette select the bottom layer (raster 1) and flood fill with #fff0cc
Zoom the image down to 12%
and take a screen capture (press 'PrtSc SysRq' next to F12), and paste (Ctrl + V).
Then using the cropping tool, in the tools Palette, crop you image
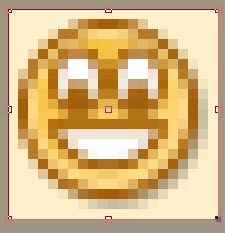
and there you have it.

Open a new image 200 x 200 pixels
Create a new Raster Layer (Layers > New Raster Layer)
In the Tools Toolbar palette, select the selection tool, and make these settings
Selection Type: Circle
Mode: Replace
Feather: 0
Anti-alias: Checked
Click on the info Tab in the Overview Palette, and position your cursor in the centre of the image (x:100 y:100), and create a circle 150 x 150 pixels.
Click on the forground a stroke properties material box to open up the Material Properties dialogue, and enter this colour #9f5800 .Press ok.
In the Tools Toolbar palette, select the Flood Fill tool, and fill the selection.
Create a new Raster Layer (Layers > New Raster Layer)
Go to Selections > Modify > Contract Number of Pixels: 8. Press ok.
Click on the forground a stroke properties material box to open up the Material Properties dialogue, and enter this colour #ffde8c .Press ok.
and flood fill the selection
Create a new Raster Layer (Layers > New Raster Layer)
Go to Selections > Modify > Contract Number of Pixels: 8. Press ok.
Click on the background and fill properties material box to open up the Material Properties dialogue, and enter this colour #f7bd31 .Press ok.
Then, Click on the forground a stroke properties material box to open up the Material Properties dialogue, and select the Gradient Tab. Select the foreground-Background Gradient, and make these settings
Angle: 145
Repeats: 0
Invert: Checked
Style: Linear
Press ok, and flood fill the selection.
Go to Selections > Select None or (Ctrl +D)
Go to the layers Palette, and click layer 2.
Then go to Effects > 3d Effects > Dropshadow and make these settings
Vertical: 6
Horizontal: 6
Opacity: 30
Blur: 4.00
Colour: #000000
And Press ok.
That's the main smilie image completed. Save as a psp. file.
Now to create a smilie face ;D
Click on Raster layer 4, and Create a new Raster Layer (Layers > New Raster Layer)
In the Tools Toolbar palette, select the selection tool, and make these settings
Selection Type: Elipse
Mode: Replace
Feather: 0
Anti-alias: Checked
Click on the info Tab in the Overview Palette, and position your cursor in the centre of the image (x:100 y:100), and create an Elipse 48 x 60 pixels.
Floodfill the selection with the border colour #9f5800
Go to Selections > Modify > Contract Number of Pixels: 8. Press ok.
Then, Floodfill the selection with #ffffff
Create a new Raster Layer (Layers > New Raster Layer)
Then, Go to Selections > Modify > Contract Number of Pixels: 8. Press ok.
Floodfill the selection with the #9f5800
Go to Selections > Select None or (Ctrl +D)
In the Tools Toolbar palette, select the Move tool and position the filled selection downwards
make sure that Raster 6 is highlighted in the layers palette, and go to Layers > Merge > Merge down.
Using the the Move tool, move the eye into position
Go to Layers > Duplicate
Then Image > Mirror (or Ctrl + M)
In the layers Palette, Click on Raster Layer 4, and Go to Selections > Select All (or Ctrl + A)
Then go to Selections > Float (or Ctrl + F)
Then go to Selections > Defloat (or Ctrl + Shift + F)
Click on the Top layer (should be copy of Raster 5) and Create a new Raster Layer (Layers > New Raster Layer)
Then, Go to Selections > Modify > Contract Number of Pixels: 8. Press ok.
In the Tools Toolbar palette, select the selection tool, and make these settings
Selection Type: Rectangle
Mode: Replace
Feather: 0
Anti-alias: Checked
Holding down the Ctrl Key (or select mode: Remove), start at the top left of the image and make a selection
when you release the left mouse button, you should have a selection like this
Flood fill the selection with #9f5800, then Go to Selections > Modify > Contract Number of Pixels: 8, and flood fill the selection with #ffffff
Go to Selections > Select None or (Ctrl +D)
In the Layers Palette select the bottom layer (raster 1) and flood fill with #fff0cc
Zoom the image down to 12%
and take a screen capture (press 'PrtSc SysRq' next to F12), and paste (Ctrl + V).
Then using the cropping tool, in the tools Palette, crop you image
and there you have it.


 and i love your pinky smilie ;D
 im used to photoshop


