Post by matthew on Dec 11, 2005 11:03:09 GMT -5
Glassy Font Tutorial
Open up a new image 300 X 100 and add a new Raster Layer Layers > New Raster Layer (Ok)

In the Materials Palette set the colour #dfa721 in as your forground and click the transparant tab on your background material properties.
Select the Text Tool and make these settings

I'm using the Transmaidens Font
Click on Raster 1 of your image and enter the text (Click apply)
You now have made a floating selection around the text.
Go to selections > defloat (Ctrl + shift + f) to place the selection on the Raster 1 layer.

Click on your background layer in the Layers Palette

And create a new Raster Layer Layers > New Raster Layer (Ok)

Go to Selections > Modify > Expand. Set number of pixels to 1 and press ok.
Set a lighter shade of orange (to create a subtle highlight around the text) in Background properties/colours. I'm using #e4b440
with Raster 2 still highlighted Select the Fill Tool, and fill the selections around the text.
Click on your background layer in the Layers Palette and add a new Raster Layer Layers > New Raster Layer (Ok)
Go to Selections > Modify > Expand. Set number of pixels to 1 and press ok.
Set this brown colour #42311c in your forground Properties box and with Raster 3 highlighted in the Layers Palette, fill the selections.This will create a dark brown outline around your text.

Click on your background layer in the Layers Palette and add a new Raster Layer Layers > New Raster Layer (Ok)
Go to Selections > Modify > Expand. Set number of pixels to 3 and press ok.
Set this colour #684d2e in your forground Properties box and with Raster 4 highlighted in the Layers Palette, fill the selection.

Click on your background layer in the Layers Palette and add a new Raster Layer Layers > New Raster Layer (Ok)
Go to Selections > Modify > Expand. Set number of pixels to 1 and press ok.
Again, set this colour #42311c in your forground Properties box and with Raster 5 highlighted in the Layers Palette, fill the selection.

Go to Selections > Modify > Contract. Set number of pixels to 5 and press ok.

Click on The topmost layer in the layers palette (Raster 1), and add a new Raster Layer Layers > New Raster Layer (Ok)
Select the Selection tool and make these settings

Hold down the left mouse button and make an eliptical selection, as in the example below. When you have the selction correctly postioned let go of the mouse button.

click on the Background material properties box and select the fading white gradient. Make these settings.
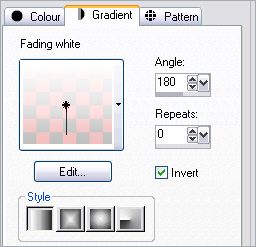
With Raster 7 highlighted in the layers palette, fill the selections.
go to Selection > Select none (Ctrl + d)
Reduce the opacity of layer 7 to 30 %
Hide the Background layer by clicking the visibility toggle off.
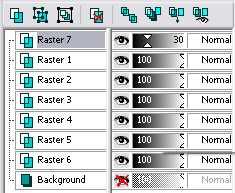
And go to Layer > Merge > Merge visible
Go to Effects > 3D Effects > Dropshadow, and make these settings
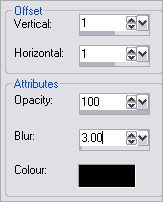
And that's it

Open up a new image 300 X 100 and add a new Raster Layer Layers > New Raster Layer (Ok)

In the Materials Palette set the colour #dfa721 in as your forground and click the transparant tab on your background material properties.
Select the Text Tool and make these settings

I'm using the Transmaidens Font
Click on Raster 1 of your image and enter the text (Click apply)
You now have made a floating selection around the text.
Go to selections > defloat (Ctrl + shift + f) to place the selection on the Raster 1 layer.

Click on your background layer in the Layers Palette

And create a new Raster Layer Layers > New Raster Layer (Ok)

Go to Selections > Modify > Expand. Set number of pixels to 1 and press ok.
Set a lighter shade of orange (to create a subtle highlight around the text) in Background properties/colours. I'm using #e4b440
with Raster 2 still highlighted Select the Fill Tool, and fill the selections around the text.
Click on your background layer in the Layers Palette and add a new Raster Layer Layers > New Raster Layer (Ok)
Go to Selections > Modify > Expand. Set number of pixels to 1 and press ok.
Set this brown colour #42311c in your forground Properties box and with Raster 3 highlighted in the Layers Palette, fill the selections.This will create a dark brown outline around your text.

Click on your background layer in the Layers Palette and add a new Raster Layer Layers > New Raster Layer (Ok)
Go to Selections > Modify > Expand. Set number of pixels to 3 and press ok.
Set this colour #684d2e in your forground Properties box and with Raster 4 highlighted in the Layers Palette, fill the selection.

Click on your background layer in the Layers Palette and add a new Raster Layer Layers > New Raster Layer (Ok)
Go to Selections > Modify > Expand. Set number of pixels to 1 and press ok.
Again, set this colour #42311c in your forground Properties box and with Raster 5 highlighted in the Layers Palette, fill the selection.

Go to Selections > Modify > Contract. Set number of pixels to 5 and press ok.

Click on The topmost layer in the layers palette (Raster 1), and add a new Raster Layer Layers > New Raster Layer (Ok)
Select the Selection tool and make these settings

Hold down the left mouse button and make an eliptical selection, as in the example below. When you have the selction correctly postioned let go of the mouse button.

click on the Background material properties box and select the fading white gradient. Make these settings.

With Raster 7 highlighted in the layers palette, fill the selections.
go to Selection > Select none (Ctrl + d)
Reduce the opacity of layer 7 to 30 %
Hide the Background layer by clicking the visibility toggle off.

And go to Layer > Merge > Merge visible
Go to Effects > 3D Effects > Dropshadow, and make these settings

And that's it

