Post by matthew on Dec 21, 2005 2:49:03 GMT -5
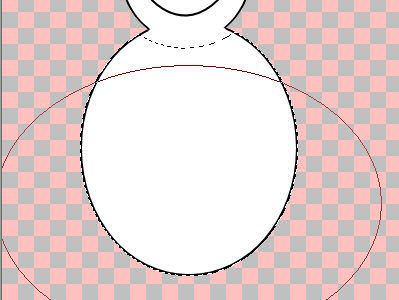
Open a new image 400X500 Pixels, with a Transparent Background.
Create a New Raster Layer (layers > New Raster Layer) Name it 'Body', and press ok.
select the Selection tool in the tool bar palette and make these settings

Draw 2 Elipses to form the snowman's body

Go to the Materials Palette and set the colour (#000000) black to your forground and
stroke materials box.
Select the Fill tool and fill the selection.
Create a New Raster Layer (layers > New Raster Layer) and press ok.
Go to Selections > Modify > contract > Number of pixels: 2
Then flood fill the selection with White (#000000)
Go to Selections > Select none (Ctrl+D)

Create a New Raster Layer (layers > New Raster Layer) and press ok.
select the Selection tool and draw an Elipse for the snowman's nose
Flood fill with black.
Go to Selections > Modify > contract > Number of pixels: 2
And floodfill the selection with Red. I'm using #d21212
Go to Selections > Select none (Ctrl+D)
Create a New Raster Layer (layers > New Raster Layer) and press ok.
Now for the snow mans eyes create a small elipse and flood fill with black.
Go to Layers > Duplicate.
Select the Move Tool From the tools Palette, and position the eyes and nose

Select the Pen Tool From the tools Palette, and make these settings

In the materials palette, Set black as your Forground and stroke, and click on the transparant
tab for your background and fills properties.

Left click below the snowman's nose to the left, to create a starting point.

Then hold down the Shift key and left click on the right. Hold the Left mouse button, but let
go of the shift key.

Drag the mouse up to the right to create a happy smilie curve

Go to Selections > Select none (Ctrl+D)

Click on the 'body' layer in the Layers Palette and go to Selections > Select all.
Then
Selections > Float
Selections > DeFloat
Create a New Raster Layer and Go to Layers > Arrange > Bring To Top
Select the Selection tool and make these settings

place the cursor just above the snowman's head as your starting point, and Create an elipse.

This will remove the top half of the selection

Create another elipse with your starting point around the bottom middle of the snowman's body
and remove the bottom half of the selection

Change your Selection Type to Rectangle, and the mode to Add (shift), and add a
rectangle to the selection

Flood fill the selection black.
go to Selections > modify > Contract > Number of Pixels:2
And fill with the Red.
Selections > Select none (Ctrl+D)
Create a New Raster Layer
now we are going to make our Snowman a hat.
Change your Selection Type back to Elipse, and make a selection on the top of the
snowman's head.

Change your Selection Type back to Rectangle
and add a rectangle to the selection

Change your Selection Type back to Elipse and add a slight curve to the top of the hat

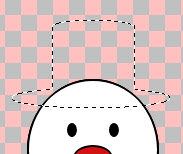
fill with Black
Selections > Select none (Ctrl+D)
Use the Move tool to position the hat.

Now to give the snowman some Twiggy Arms
Select the Pen Tool and make these settings.

Set black as your forground and stroke colour, and draw a stick arm. Much the same way as the
smile, only without adding the curve.
Selections > Select none (Ctrl+D)
Do the same for the other side of the snowman.

then add some little twiggys

Create a New Raster Layer and select the selection Tool, and draw and elipse. Flood fill
with black.
Selections > Select none (Ctrl+D)
duplicate the layer twice. Use the Move tool to position the buttons.
then go to Layers > Merge > Merge visible
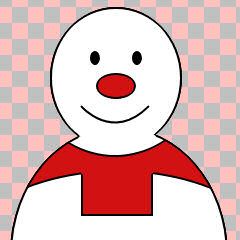
and that's it ;D

Merry Christmas everybody!!
Create a New Raster Layer (layers > New Raster Layer) Name it 'Body', and press ok.
select the Selection tool in the tool bar palette and make these settings
Draw 2 Elipses to form the snowman's body
Go to the Materials Palette and set the colour (#000000) black to your forground and
stroke materials box.
Select the Fill tool and fill the selection.
Create a New Raster Layer (layers > New Raster Layer) and press ok.
Go to Selections > Modify > contract > Number of pixels: 2
Then flood fill the selection with White (#000000)
Go to Selections > Select none (Ctrl+D)
Create a New Raster Layer (layers > New Raster Layer) and press ok.
select the Selection tool and draw an Elipse for the snowman's nose
Flood fill with black.
Go to Selections > Modify > contract > Number of pixels: 2
And floodfill the selection with Red. I'm using #d21212
Go to Selections > Select none (Ctrl+D)
Create a New Raster Layer (layers > New Raster Layer) and press ok.
Now for the snow mans eyes create a small elipse and flood fill with black.
Go to Layers > Duplicate.
Select the Move Tool From the tools Palette, and position the eyes and nose
Select the Pen Tool From the tools Palette, and make these settings
In the materials palette, Set black as your Forground and stroke, and click on the transparant
tab for your background and fills properties.
Left click below the snowman's nose to the left, to create a starting point.
Then hold down the Shift key and left click on the right. Hold the Left mouse button, but let
go of the shift key.
Drag the mouse up to the right to create a happy smilie curve
Go to Selections > Select none (Ctrl+D)
Click on the 'body' layer in the Layers Palette and go to Selections > Select all.
Then
Selections > Float
Selections > DeFloat
Create a New Raster Layer and Go to Layers > Arrange > Bring To Top
Select the Selection tool and make these settings
place the cursor just above the snowman's head as your starting point, and Create an elipse.
This will remove the top half of the selection
Create another elipse with your starting point around the bottom middle of the snowman's body
and remove the bottom half of the selection
Change your Selection Type to Rectangle, and the mode to Add (shift), and add a
rectangle to the selection
Flood fill the selection black.
go to Selections > modify > Contract > Number of Pixels:2
And fill with the Red.
Selections > Select none (Ctrl+D)
Create a New Raster Layer
now we are going to make our Snowman a hat.
Change your Selection Type back to Elipse, and make a selection on the top of the
snowman's head.
Change your Selection Type back to Rectangle
and add a rectangle to the selection
Change your Selection Type back to Elipse and add a slight curve to the top of the hat
fill with Black
Selections > Select none (Ctrl+D)
Use the Move tool to position the hat.
Now to give the snowman some Twiggy Arms
Select the Pen Tool and make these settings.
Set black as your forground and stroke colour, and draw a stick arm. Much the same way as the
smile, only without adding the curve.
Selections > Select none (Ctrl+D)
Do the same for the other side of the snowman.
then add some little twiggys
Create a New Raster Layer and select the selection Tool, and draw and elipse. Flood fill
with black.
Selections > Select none (Ctrl+D)
duplicate the layer twice. Use the Move tool to position the buttons.
then go to Layers > Merge > Merge visible
and that's it ;D
Merry Christmas everybody!!


 Very sophisticated