
Post by matthew on Dec 3, 2005 3:32:06 GMT -5
Creating folder icons using Microsoft's Paint
Copy and paste this image into Paint
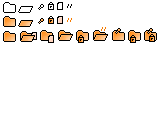
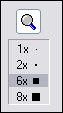
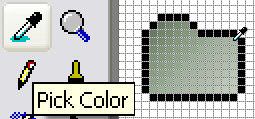
Select the lens tool, and magnify by 600%
Select the Select tool, and make a selection around the main folder icon, and copy (Ctrl+C)

Then paste in the area below the icons. Select the Lens Tool again and this time magnify to 800%.
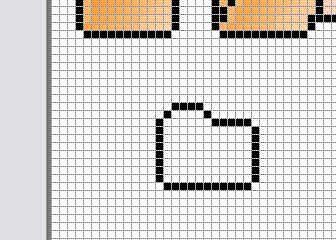
It will also help, at this point, to switch on the Grid tool (Ctrl+G or View > Zoom > Show Grid,
and Show Thumbnail ( View > Zoom > Show Thumbnail)

At his point you might want to read my tutorial on [url=http://overcomersgfx.proboards42.com/index.cgi?
board=progfx&action=display&thread=1106729078]how to create gradients in Paint[/url].
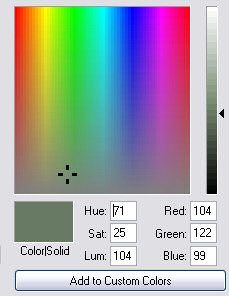
I'm going to make a dark to light diagonal gradient for my Folder icon. Go tocolours > Edit Colours > Define custom Colours, and select a colour. I'm using this shade of green.
select the Line tool , and begin making the gradient in the top left of the folder.
Keep adding lines of colour gradually getting lighter and lighter in luminescence, as explained in the
gradient tutorial.
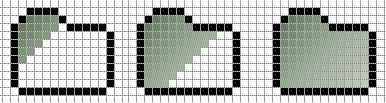
next select the Dropper Tool and colourpick from the top right of the folder icon.
Using the Line Tool and add a highlight from the top right to the bottom left side of the folder icon

And that's the main icon complete ;D
select the Select tool and make a selection around the folder icon and place below the orange example folders.

We are now going to add a gradient to the 'open' part of the folder image.
still using the same colour make a line of colour as shown below, and gradually get darker in luminescence. then add the highlight colour across the top.

Moving on to the sticky pin image... select, copy and paste, as before, and select the Fill with Colour tool
 , and fill the top of the pin using the green already set in your colour palette.
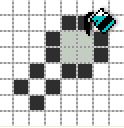
Then add a highlight.
Then add a little dot of an even lighter shade of green to give the pin a sparkle.
With the same colour fill in the rest of the image.
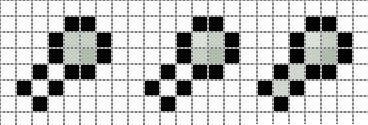
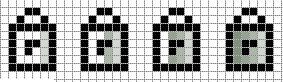
Now that the sticky pin is complete, move it up with the select tool, and select, copy and paste the Lock image.
Select the Line Tool, and with the same colour used to finish of the sticky pin, add a vertical line of colour on the right hand side of the image.
The gradient on the lock wants to be more extreme than the gradient for the folder so make considerably wider jumps between each shade , from light to dark.
Once finished move it up next to the other completed Images, and select, copy and paste the topic image. Rather that mess around making a gradient, we are going to just give it a simple buttonized look using a highlight, as in the image below.
Using the Fill with Colour tool, Fill with a nice light shade and then add the highlight with the Line Tool

One more image to go, the flames image (Select copy and paste as before), which is really simple. Just fill with a dark shade of green, and move it up alongside the other images. now we can piece them together ;D

Select the Select tool, only , this time, making sure that that Draw Opaque is unchecked. You can do this by going to Image > Draw Opaque or by clicking the transparent tab at the bottom of the tool bar.

Now you can select the images and slot them all together, following the examples given above

All that's left to do now is to convert them to gifs and make them transparent.
Colour fill the background with a suitable colour you will want to use to make the background transparent. Any colour will do that hasn't been used in the images. I'm using blue.

Then using the select tool, copy and paste all the icons individually into an image editor that allows you to save gifs.
i suggest you use Xnview, because (((Thump))) has written a tutorial for it ;D
To copy and paste images into Xnview, go to Image > import clipboard
Once you have them saved as gifs you can use Gifworks online to make the icons transparent.
Copy and paste this image into Paint
Select the lens tool, and magnify by 600%
Select the Select tool, and make a selection around the main folder icon, and copy (Ctrl+C)
Then paste in the area below the icons. Select the Lens Tool again and this time magnify to 800%.
It will also help, at this point, to switch on the Grid tool (Ctrl+G or View > Zoom > Show Grid,
and Show Thumbnail ( View > Zoom > Show Thumbnail)
At his point you might want to read my tutorial on [url=http://overcomersgfx.proboards42.com/index.cgi?
board=progfx&action=display&thread=1106729078]how to create gradients in Paint[/url].
I'm going to make a dark to light diagonal gradient for my Folder icon. Go tocolours > Edit Colours > Define custom Colours, and select a colour. I'm using this shade of green.
select the Line tool
, and begin making the gradient in the top left of the folder.Keep adding lines of colour gradually getting lighter and lighter in luminescence, as explained in the
gradient tutorial.
next select the Dropper Tool and colourpick from the top right of the folder icon.
Using the Line Tool and add a highlight from the top right to the bottom left side of the folder icon
And that's the main icon complete ;D
select the Select tool and make a selection around the folder icon and place below the orange example folders.
We are now going to add a gradient to the 'open' part of the folder image.
still using the same colour make a line of colour as shown below, and gradually get darker in luminescence. then add the highlight colour across the top.
Moving on to the sticky pin image... select, copy and paste, as before, and select the Fill with Colour tool
, and fill the top of the pin using the green already set in your colour palette.Then add a highlight.
Then add a little dot of an even lighter shade of green to give the pin a sparkle.
With the same colour fill in the rest of the image.
Now that the sticky pin is complete, move it up with the select tool, and select, copy and paste the Lock image.
Select the Line Tool, and with the same colour used to finish of the sticky pin, add a vertical line of colour on the right hand side of the image.
The gradient on the lock wants to be more extreme than the gradient for the folder so make considerably wider jumps between each shade , from light to dark.
Once finished move it up next to the other completed Images, and select, copy and paste the topic image. Rather that mess around making a gradient, we are going to just give it a simple buttonized look using a highlight, as in the image below.
Using the Fill with Colour tool, Fill with a nice light shade and then add the highlight with the Line Tool
One more image to go, the flames image (Select copy and paste as before), which is really simple. Just fill with a dark shade of green, and move it up alongside the other images. now we can piece them together ;D
Select the Select tool, only , this time, making sure that that Draw Opaque is unchecked. You can do this by going to Image > Draw Opaque or by clicking the transparent tab at the bottom of the tool bar.
Now you can select the images and slot them all together, following the examples given above
All that's left to do now is to convert them to gifs and make them transparent.
Colour fill the background with a suitable colour you will want to use to make the background transparent. Any colour will do that hasn't been used in the images. I'm using blue.
Then using the select tool, copy and paste all the icons individually into an image editor that allows you to save gifs.
i suggest you use Xnview, because (((Thump))) has written a tutorial for it ;D
To copy and paste images into Xnview, go to Image > import clipboard
Once you have them saved as gifs you can use Gifworks online to make the icons transparent.


 better than mine I reckon. Good job ;D


 someone somewhere must have tried it atleast


