
Post by admin on Aug 23, 2005 15:48:18 GMT -5
One of my favourite things to do when making a siggy is actually cutting out the background. I know. I'm strange. LOL Well, I am going to teach you guys my technique 
1. Choose a picture. This is the picture I am going to use in this tutorial:

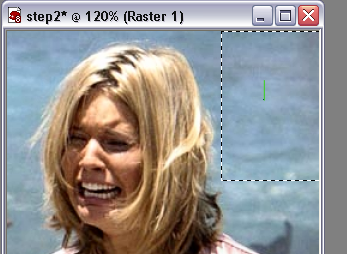
2. crop the picture so that it is what you will be using in the sig. Then there is less to erase.

3. Use the select tool and/or the magic wand to get most of the background erased. Set the tolerance to around 15. For the first time, select a section and then with your background eraser, make a small swipe in it. Then press your delete key. This will delete the background that is selected. And then continuing until most of the background is erased around your picture.
4. When this is done, there will be some bits and pieces that are left behind. Then, with your background eraser, with these settings:

Go around the edges of the picture and erase all the background that was missed

I usually set my view to like 800 or 1200 percent so that I can see every little bit of stuff left. It takes time and a steady hand, but it is definately worth going around the entire image with your background eraser. You will have a nice clean picture and will look much better.

There will be harder parts to do that have very similar colours. In these situations, I make sure I decrease and increase the size to see what exactly I am erasing. When I am doing like hair and stuff like that, every couple of erases, I change the size back to normal to make sure that I didn't erase anything essential. To make sure the picture will look good in the end.
This is how it should look like in the end:

5. When you have finish erasing all of the background, then select your soften brush with these settings:

Go around the edges of the picture and soften it.

6. With your select tool with these settings:

go around the picture. I usually do it pretty close to the face so the feather shows up on the picture.

Then, cut and paste it into the canvas where you will be making your siggy.

Place it where you would want it.
7. Then with your Eraser Tool with these settings:

go around the image very close to the edge to help blend the image into the background even more.

8. After that, grunge the background and add text (we will make another tutorial how to do these steps later )
And this is what I came up:

Have fun!
~ Shan
1. Choose a picture. This is the picture I am going to use in this tutorial:
2. crop the picture so that it is what you will be using in the sig. Then there is less to erase.
3. Use the select tool and/or the magic wand to get most of the background erased. Set the tolerance to around 15. For the first time, select a section and then with your background eraser, make a small swipe in it. Then press your delete key. This will delete the background that is selected. And then continuing until most of the background is erased around your picture.
4. When this is done, there will be some bits and pieces that are left behind. Then, with your background eraser, with these settings:
Go around the edges of the picture and erase all the background that was missed
I usually set my view to like 800 or 1200 percent so that I can see every little bit of stuff left. It takes time and a steady hand, but it is definately worth going around the entire image with your background eraser. You will have a nice clean picture and will look much better.
There will be harder parts to do that have very similar colours. In these situations, I make sure I decrease and increase the size to see what exactly I am erasing. When I am doing like hair and stuff like that, every couple of erases, I change the size back to normal to make sure that I didn't erase anything essential. To make sure the picture will look good in the end.
This is how it should look like in the end:
5. When you have finish erasing all of the background, then select your soften brush with these settings:
Go around the edges of the picture and soften it.
6. With your select tool with these settings:
go around the picture. I usually do it pretty close to the face so the feather shows up on the picture.
Then, cut and paste it into the canvas where you will be making your siggy.
Place it where you would want it.
7. Then with your Eraser Tool with these settings:
go around the image very close to the edge to help blend the image into the background even more.
8. After that, grunge the background and add text (we will make another tutorial how to do these steps later
)And this is what I came up:
Have fun!
~ Shan