Post by matthew on Jan 14, 2006 3:56:13 GMT -5
Creating abstract and grungy backgrounds for signature banners in Paint Shop Pro
To kick start things I use a grunge brush to make a basic background. I'm using an almost black colour (#0a0a0a) in one colour box, and an almost white colour (#f5f5f5) in the other. If i just used white and black I wouldn't be able to colourize it. You can use this background to follow the tutorial

I have all my favourite effect Icons across the top of my workspace like this

Which include the following effects and adjustments
Blinds
Buttonize
Dropshadow
Enamel
Inner Bevel
Wind
Edge preserving Smooth
Curlicues
Displacement Map
Lens Distortion
Polar Coordinates
Ripple
Punch
Sculpture
Skew
Spiky Halo
Topography
Twirl
Warp
Wave
Colour Balance
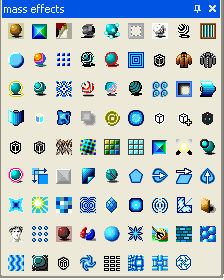
Also I've made a custom Palette, with most of the different effects and adjustments.

It makes experimenting with all the different effects much easier.
Duplicate the background layer (Layers > Duplicate)
and select Colour Balance (Adjust > Colour Balance > Colour Balance) and make these settings
75
20
-75
Go to the Tools Palette and select the Eraser Tool and make these settings
Size: 90
Hardness: 50
Opacity: 25
Erase some of the duplicated layer to reveal the original colour beneath

Then merge (Layers > Merge > Merge Down), and duplicate.
Again, select Colour Balance, and make these settings
-20
20
-75
and repeat the process.

now try some effects. remember to Erase when needed using the method above, merge down and duplicate.
Select Skew (Effects > Geometric Effects > Skew) and make these settings
Vertical: Checked
skew Angle: 45
Repeat: Checked
press ok
Eraser Tool: yes

Select Sculpture (Effects > Texture Effects > Sculpture)
Pattern: Cactus
Size: 40
Smoothness: 15
Depth: 100
Ambience: -100
Shininess: 60
Colour: #ffffff
Angle: 45
Intensity: 80
Elevation: 40
Press ok and reduce the layer's opacity to 30
Eraser Tool: yes

Select Blinds (Effects > Texture Effects > Blinds)
Width: 2
opacity: 10
Colour: #ffffff
Horizontal: Checked
press ok
Eraser Tool: yes
select blinds again and change the horizontal to vertical
Width: 2
opacity: 10
Colour: #ffffff
Light from Left/Top: Checked
press ok.
Eraser Tool: yes

Select Inner Bevel (Effects > 3D Effects > Inner Bevel)
Bevel Type: 8
Width: 8
Smoothness: 10
Depth: 10
Ambience: 40
Shininess: 10
Colour: #ffffff
Angle: 225
Intensity: 30
Elevation: 40
Eraser Tool: no

Select Wave (Effects > Distortion Effects > Wave)
Horizontal
Amplitude: 55
Wavelength: 15
Vertical
Amplitude: 65
Wavelength: 65
press ok
Eraser Tool: yes

Keep experimenting with all the different effects and settings. the possibilities are endless. ;D
To kick start things I use a grunge brush to make a basic background. I'm using an almost black colour (#0a0a0a) in one colour box, and an almost white colour (#f5f5f5) in the other. If i just used white and black I wouldn't be able to colourize it. You can use this background to follow the tutorial


I have all my favourite effect Icons across the top of my workspace like this

Which include the following effects and adjustments
Blinds
Buttonize
Dropshadow
Enamel
Inner Bevel
Wind
Edge preserving Smooth
Curlicues
Displacement Map
Lens Distortion
Polar Coordinates
Ripple
Punch
Sculpture
Skew
Spiky Halo
Topography
Twirl
Warp
Wave
Colour Balance
Also I've made a custom Palette, with most of the different effects and adjustments.

It makes experimenting with all the different effects much easier.
Duplicate the background layer (Layers > Duplicate)
and select Colour Balance (Adjust > Colour Balance > Colour Balance) and make these settings
75
20
-75
Go to the Tools Palette and select the Eraser Tool and make these settings
Size: 90
Hardness: 50
Opacity: 25
Erase some of the duplicated layer to reveal the original colour beneath

Then merge (Layers > Merge > Merge Down), and duplicate.
Again, select Colour Balance, and make these settings
-20
20
-75
and repeat the process.

now try some effects. remember to Erase when needed using the method above, merge down and duplicate.
Select Skew (Effects > Geometric Effects > Skew) and make these settings
Vertical: Checked
skew Angle: 45
Repeat: Checked
press ok
Eraser Tool: yes

Select Sculpture (Effects > Texture Effects > Sculpture)
Pattern: Cactus
Size: 40
Smoothness: 15
Depth: 100
Ambience: -100
Shininess: 60
Colour: #ffffff
Angle: 45
Intensity: 80
Elevation: 40
Press ok and reduce the layer's opacity to 30
Eraser Tool: yes

Select Blinds (Effects > Texture Effects > Blinds)
Width: 2
opacity: 10
Colour: #ffffff
Horizontal: Checked
press ok
Eraser Tool: yes
select blinds again and change the horizontal to vertical
Width: 2
opacity: 10
Colour: #ffffff
Light from Left/Top: Checked
press ok.
Eraser Tool: yes

Select Inner Bevel (Effects > 3D Effects > Inner Bevel)
Bevel Type: 8
Width: 8
Smoothness: 10
Depth: 10
Ambience: 40
Shininess: 10
Colour: #ffffff
Angle: 225
Intensity: 30
Elevation: 40
Eraser Tool: no

Select Wave (Effects > Distortion Effects > Wave)
Horizontal
Amplitude: 55
Wavelength: 15
Vertical
Amplitude: 65
Wavelength: 65
press ok
Eraser Tool: yes

Keep experimenting with all the different effects and settings. the possibilities are endless. ;D


 but i really want ot give this ago, Mikey you know where ot get loads of PSP9 trials, any links pleeeease?


